Mikayla recently wrote about how she has learned to enjoy winter in New Hampshire, citing winter sports as a key factor.
Winter can be a slog if you don’t have a means to enjoy its offerings. Getting out into the woods with snow covered trees and a muted stillness in the air can be magical, and by keeping yourself moving you won’t get too chilly.
Read on to learn the basics of Classic skiing (a discipline of cross-county skiing under the “Nordic” umbrella) and how you can get yourself on a pair of skis on the cheap.
How it came about
When early humanity began making tools to better their lives, they often produced items that were adapted to their environments. It is in such a way that skiing first came about, with carved wooden planks and leather loop bindings being fashioned by rugged peoples of northern Eurasia to help them quickly traverse the winter landscapes they inhabited.
Skis offered both weight distribution (to keep them from post-holing into deep snow when carrying loads) and more speedy travel (if you glide a few feet with every step, you are that much more efficient with your energy).
Over the years, skiing has come a long way from its humble origins; it exists today almost entirely for recreation, which is where we will focus moving forward in this post.
What it is
At its very basic, Classic skiing is just walking on skis.
The skis themselves are set up with a curved shape along its length (referred to as the “camber” of the ski) rather than lying flat on the ground. For Nordic skiing, this setup allows for minimal surface contact of the ski with the snow so as to lessen frictional resistance; you might think that snow is slippery (and it is!) but it’s still friction between the snow and the ski that brings you to a stop!
For Classic skiing in particular, the shape of the ski allows for the section under your foot to be altered in a way that provides grip on the snow surface. Very often this is achieved with something called a “fish-scale” pattern, a series of carved grooves in the base of the ski that allow for movement across the snow in one direction while cutting into the snow and offering purchase in the other.
(The other method involves using a special type of “kick-wax” to coat the ski in a material that grips the snow, but we will not focus on that today.)
How to do it
A good way to get started on Classic skis is to find an open, flat area to practice shuffling around. You might have some trails near where you live, or a local sports field or golf course covered in snow would work.
When just starting out, I would recommend that you don’t use any poles – I know you might want them for balance, but it’s important that they don’t become a crutch that keeps you from establishing a good grip underfoot.
Getting grip
As you put weight onto one of your feet (just as if you were walking or jogging and stepping along), you will flex the ski in an effort to have it lay flat on the snow. If the ski is not too stiff for your weight/strength, you will have flexed the ski to the point where the “kick-zone” is engaged and you will be able to propel yourself forward into the next step.
Make sure to pressure the ball of your foot, keep a slight bend in your knees for balance, and rock your body’s weight side to side in order to fully load up the kick ski.
Gliding
As you get comfortable getting grip with each ski, start thinking about getting glide out of the other.
Like I mentioned above, a big advantage of skiing is that you can go multiple times the distance you could walk with the same amount of effort – provided you are able to glide a few feet with each step!
When you push off from your kick ski onto the glide ski, try driving your hip forward overtop the glide ski. This helps move your center of gravity forward onto the ski, which propels you down the trail ahead.
Arm movement
Lastly, consider where your arms have been naturally moving (if you left the poles by the side of the trail like I suggested!).
Because Classic skiing is similar to walking/jogging, you should find yourself swinging your arms in a similar manner and cadence as if you didn’t have skis strapped to your feet. Namely, the opposite arm is swung forward than the current gliding ski.
The zenith of your arm’s swing should be right about when you are ready to transition the glide ski into the kick ski, so that you plant the pole concurrently with when you load up the ski for grip. This lets yourself have two points of contact on opposite sides of your body for balance, both working to push yourself forward.
Rinse and repeat on the opposite side, and you’ve got a striding technique in the works!
When you should book a lesson
A good instructor will tell you that time on snow is your best teacher – and yet, it can be very detrimental to build muscle memory for an incorrect technique.
I definitely advise you to get out a number of times on your skis to become comfortable before considering a lesson, but once you can cruise around without falling over you may want to consider snagging one at a local Nordic Center. This way you won’t be paying someone to watch you learn how to balance on skis, and instead your dollar will go towards meaningful instruction and actionable advice.
I certainly tried to write a comprehensive summary of the basics above, but there’s nothing quite like an in-person instructor to help assure that you’ve got the right idea and the correct form!
Equipment & where to find it
Classic skiing can be among the least expensive of the winter skiing options when you are first starting out. There are so many people that look to offload older gear throughout the year via yard sales, digital marketplaces, or ski swaps.
Oftentimes, the gear people are choosing to get rid of might not even be in bad shape; lots of folks splurge on a high-level set up, ski a few times, and then end up selling the equipment a few seasons later to clear up space in their basement. Their short attention span is your profit!
So what should you be looking for? You’ll need to get yourself a pair of skis, some comfortable boots, and a set of poles. Easy enough!
Skis: weight range is key
For just getting started, you should keep an eye out for a pair of fish-scale skis that are suitable for your weight.
Ski design has changed over the years, so don’t believe anyone who tells you that the length of the skis is the determining factor – it can be nice to have shorter skis when you are first starting out, but an older ski in your weight range will very likely be longer than a more modern ski. Both are perfectly suitable.
Look for a weight range printed onto the surface of the ski to start, but if that is rubbed off you will want to consult someone knowledgeable.
Most ski swaps will have someone on hand to assist with testing the flex of a ski, which is important to make sure you aren’t slipping backwards every time you try to move. If a ski is too stiff for your weight/strength, it will be very hard to make solid contact between the fish-scale grip and the surface of the snow.
If you are instead buying from someone directly, ask if they have a sense of the weight range, or see if you can find the ski online to determine its characteristics.
Boots: ensure compatibility with your bindings
Boots should fit like a running sneaker, and really tend to be pretty comfortable.
Sizing is very often European, so you may want to have a conversion table on hand when perusing for gear.
The only tough part with boots will be making sure that what you are buying is compatible with the bindings of your skis (and to that point, I have assumed above that a used pair of skis is coming already mounted with a bindings setup). There are a few different styles of bindings and corresponding boots, and while there is some interchangeability between them, it is always good to be sure that what you are buying will work with what you have.
I am not going to go into much detail here, but a simple approach is to have either the skis or boots (whichever you bought first) on hand for when you are getting the other item. This way, you can try to snap the boot into the binding – you will find out very quickly if they work together or not!
Poles
Poles should be a little easier.
Really, you are just looking for two matching poles that fit under your armpit when standing straight. This quick measurement is easy and determines if a pole is the right height to correctly complement your stride technique.
Beyond that, I think there are three considerations for poles:
- overall weight
- size of the snow basket
- type of grip strap
Some simple, older poles are probably made of a heavier material, have comically large snow baskets and a simple loop strap for your wrist. However, these sturdy implements might come cheap and certainly will get the job done – heck, the larger snow baskets may even be preferred if you anticipate skiing ungroomed trails more often than groomed terrain!
If you instead want a more modern pole, look for smaller asymmetric snow baskets and a Velcro grip often referred to as a “power strap.”
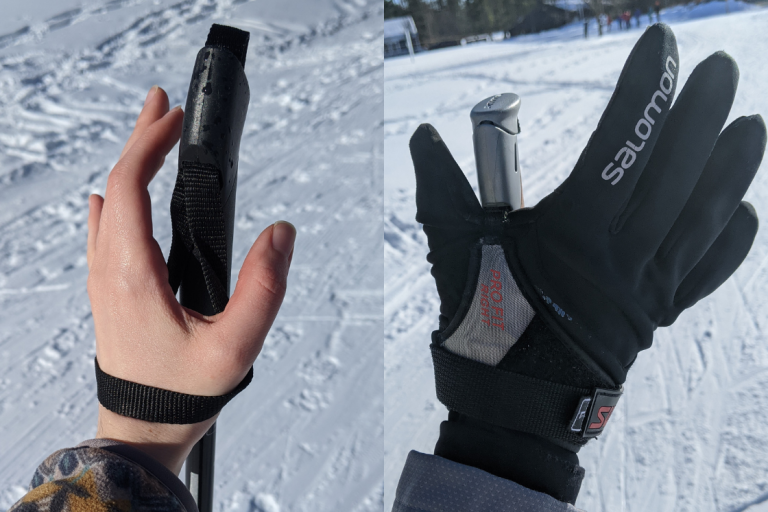
The lighter a pole is, the easier it will be to maneuver when you are tired while on a long ski outing, and the power strap allows for more connection between your hand and the pole without needing to have a death-grip on the handle.
Give it a go!
Before you head outside, it’s worth noting that Nordic skiing is more cardio and sweat-inducing than other winter activities. It’s worth having some water/wind-resistant clothing that isn’t your big parka or insulated snow pants. Layers are key because you will likely start out rather cold and then get increasingly warmer as you go.
Now get out there and have some fun!